19 C/C++ 操作 MySQL

C/C++ 操作 MySQL

1. 准备工作

1. 环境准备

安装 MySQL 的 C 语言客户端开发库(包含头文件和链接库):

1
2
sudo apt update
sudo apt install libmysqlclient-dev

另一个命令(可选):

1
sudo apt install -y build-essential pkg-config default-libmysqlclient-dev

这条命令会安装:

  • build-essential:包含 gcc、g++、make 等编译工具链。
  • pkg-config:用于管理库的编译和链接参数,方便 Makefile 或构建系统自动获取头文件路径和库名称。
  • default-libmysqlclient-dev:这是一个“元包”,在 Ubuntu 上通常依赖于具体的 MySQL 客户端开发库(如 libmysqlclient-dev),相当于自动选择并安装当前发行版推荐的 MySQL 客户端库。

如果希望在 C++ 中使用更“面向对象”的接口,可以考虑安装 MySQL Connector/C++

1
sudo apt install libmysqlcppconn-dev   # Ubuntu 某些版本可能不包,需从源码或第三方源安装

2. C 和 C++ 接口初识

  • MySQL C API:这是 MySQL 官方提供的原生 C 语言接口,头文件为 <mysql/mysql.h>,所有函数均以 C 语言风格导出(如 mysql_init()mysql_query() 等)。C++ 程序完全可以直接包含此头文件并调用这些函数,因为 C++兼容 C 语言。因此,如果使用 C API,那么头文件和函数接口在 C 和 C++中是完全相同的

  • MySQL Connector/C++:这是 MySQL 官方提供的面向 C++ 的专用驱动,使用面向对象的风格(如 sql::Connectionsql::Statement 等),需要安装额外的开发库(如 libmysqlcppconn-dev)。它与 C API 不同,头文件也不一样(如 <mysql_connection.h>)。这类接口是 C++特有的,C 语言无法直接使用。

2. 在 Linux 中用 C/C++操作 MySQL

1. 准备工作

先在 MySQL 中创建对应的用户并赋予权限等信息:

1
2
3
4
5
6
7
8
9
10
11
12
13
14
15
16
17
18
19
20
21
22
23
# 创建用户:仅允许本机登录,密码为 123456
mysql> create user 'local_minbit'@'localhost' identified by '123456';
Query OK, 0 rows affected (0.02 sec)

# 创建数据库:若不存在则创建。注意库名含横杠,必须用反引号 `` 包裹
mysql> create database if not exists `local-C-test`;
Query OK, 1 row affected (0.01 sec)

# 授权业务库:给该用户在 `local-C-test` 库下的所有权限
mysql> grant all privileges on `local-C-test`.* to 'local_minbit'@'localhost';
Query OK, 0 rows affected (0.01 sec)
# 授权系统表:允许该用户查看 mysql.user 表(用于查询用户列表)
mysql> grant select on mysql.user to 'local_minbit'@'localhost';
Query OK, 0 rows affected (0.02 sec)

# 切换数据库
mysql> use local-C-test;
mysql> CREATE TABLE IF NOT EXISTS student_score (
-> id INT AUTO_INCREMENT PRIMARY KEY, # 自增主键
-> name VARCHAR(100) NOT NULL, # 姓名,非空
-> subject VARCHAR(100) NOT NULL, # 科目,非空
-> score DECIMAL(5,2) NOT NULL # 分数,定点数(共5位,小数2位),防精度丢失
-> );

2. C 代码操作 MySQL

1
2
3
4
5
6
7
8
9
10
11
12
13
14
15
16
17
18
19
20
21
22
23
24
25
26
27
28
29
30
31
32
33
34
35
36
37
38
39
40
41
42
43
44
45
46
47
48
49
50
51
52
53
54
55
56
57
58
59
60
61
62
63
64
65
66
67
68
69
70
71
72
73
74
75
76
77
78
79
80
81
82
83
84
85
86
87
88
89
90
91
92
93
94
95
96
97
98
99
100
101
102
103
104
105
106
107
108
109
110
111
112
113
114
115
116
117
118
119
120
121
122
123
124
125
126
127
128
129
130
131
132
133
134
135
136
137
138
139
140
141
142
143
144
145
146
147
148
149
#include <stdio.h>
#include <stdlib.h>
#include <string.h>
#include <mysql/mysql.h> // MySQL C API 头文件

// 数据库连接参数宏定义,方便后续修改
#define DB_HOST "localhost" // 数据库地址,localhost表示本机
#define DB_USER "local_minbit" // 数据库用户名
#define DB_PASS "123456" // 数据库密码
#define DB_NAME "local-C-test" // 数据库名称


// 错误处理封装函数,当发生数据库错误时,打印错误信息并安全退出
void finish_with_error(MYSQL *con)
{
// mysql_error(con): 返回最近一次调用MySQL函数失败的错误描述字符串
fprintf(stderr, "%s\n", mysql_error(con));

// mysql_close(con): 关闭数据库连接,释放由con指向的结构体
// 注意:即使连接中间出错了,也需要调用此函数防止内存泄漏
mysql_close(con);
exit(1);
}

int main()
{
// 1. 初始化 MySQL 对象
// mysql_init(NULL): 初始化一个MYSQL结构体,分配并初始化内存
// 参数:NULL表示由库自动分配内存
// 返回值:成功返回新分配的句柄指针,失败返回NULL
MYSQL *con = mysql_init(NULL);
if (con == NULL)
{
fprintf(stderr, "mysql_init() failed\n");
exit(1);
}

// 2. 连接数据库
// mysql_real_connect(): 建立与MySQL服务器的物理连接
// 参数说明:mysql_init返回的句柄, 主机名或IP地址, 用户名, 密码, 数据库名, 端口(0表示默认), socket文件名, 客户端标志
// 注意:要连接的数据库名如果为NULL,连接后需手动选择库;端口号:0表示使用默认端口3306;
// Unix Socket文件名或命名管道名,通常设为NULL让系统自动选择;客户端标志位通常设为0
// 返回值:成功返回con指针,失败返回NULL
if (mysql_real_connect(con, DB_HOST, DB_USER, DB_PASS, DB_NAME, 0, NULL, 0) == NULL)
{
finish_with_error(con);
}

// 3. 执行插入操作
// mysql_query(): 执行由字符串表示的SQL语句
// 参数:连接句柄,SQL语句字符串
// 返回值:成功返回0,失败返回非0
// 注意:该函数会自动检测语句是否需要分号结尾(通常不需要)
if (mysql_query(con, "INSERT INTO student_score (name, subject, score) VALUES ('张三', '数学', 88.5), ('李四', '英语', 92.0)"))
{
finish_with_error(con);
}

// mysql_affected_rows(): 获取最近一次INSERT/UPDATE/DELETE操作影响的行数
// 返回值:my_ulonglong类型(64位无符号整数),如果没有匹配行则返回0
printf("插入成功,影响行数: %lu\n", (unsigned long)mysql_affected_rows(con));


// 4. 查询操作
if (mysql_query(con, "SELECT id, name, subject, score FROM student_score"))
{
finish_with_error(con);
}

// mysql_store_result(): 将查询的结果从服务器一次性取回到客户端,结果存储在内存中,必须在使用完后手动释放!
// 返回值:成功返回MYSQL_RES结构体指针,失败或无结果集返回NULL
MYSQL_RES *result = mysql_store_result(con);
if (result == NULL)
{
finish_with_error(con);
}

// mysql_num_fields(): 获取结果中字段(列)的数量
// 这对于遍历打印数据至关重要,因为我们不知道查回来有几列!
int num_fields = mysql_num_fields(result);
MYSQL_ROW row; // MYSQL_ROW 实际上是 char** 类型,代表一行数据的字符串数组

printf("\n当前成绩表数据:\n");

// mysql_fetch_row(): 从结果中获取下一行数据,工作原理类似于迭代器,每次调用自动移动到下一行
// 返回值:成功返回MYSQL_ROW(字符串数组),如果没有更多行则返回NULL
while ((row = mysql_fetch_row(result)))
{
for (int i = 0; i < num_fields; i++)
{
// row[i] 访问当前行的第 i 列数据
// 注意:如果数据库中该字段值为 NULL,row[i] 会是 NULL指针!
// 这里使用三元运算符防止空指针导致的段错误,如果是NULL则打印 "NULL"
printf("%s ", row[i] ? row[i] : "NULL");
}
printf("\n");
}

// mysql_free_result(): 释放结果集占用的内存
// 防止内存泄漏,非常重要。
mysql_free_result(result);


// 5. 更新操作:将张三的数学成绩改为95.0
if (mysql_query(con, "UPDATE student_score SET score = 95.0 WHERE name = '张三' AND subject = '数学'"))
{
finish_with_error(con);
}
printf("\n更新成功,影响行数: %lu\n", (unsigned long)mysql_affected_rows(con));


// 6. 删除操作:删除李四的英语记录
if (mysql_query(con, "DELETE FROM student_score WHERE name = '李四' AND subject = '英语'"))
{
finish_with_error(con);
}
printf("删除成功,影响行数: %lu\n", (unsigned long)mysql_affected_rows(con));


// 7. 再次查询,验证结果
if (mysql_query(con, "SELECT id, name, subject, score FROM student_score"))
{
finish_with_error(con);
}
result = mysql_store_result(con);
if (result == NULL)
{
finish_with_error(con);
}
printf("\n操作后的数据:\n");

// 复用之前的遍历逻辑
while ((row = mysql_fetch_row(result)))
{
for (int i = 0; i < num_fields; i++)
{
printf("%s ", row[i] ? row[i] : "NULL");
}
printf("\n");
}
mysql_free_result(result);


// 8. 关闭连接,mysql_close(): 断开与服务器的连接,并释放连接句柄占用的内存
// 这是最后一步清理工作!
mysql_close(con);

return 0;
}

makefile 文件:

1
2
3
4
5
6
C_conn_mysql: C_conn_mysql.c
gcc -o $@ $^ -I/usr/include/mysql -L/usr/lib/mysql -lmysqlclient

.PHONY: clean
clean:
rm -f C_conn_mysql
  • -I:用于指明头文件的搜索路径。
  • -L:用于指明库文件的搜索路径。
  • -l:用于指明需要连接库文件路径下的哪一个库。

输出:

1
2
3
4
5
6
7
8
9
10
11
插入成功,影响行数: 2

当前成绩表数据:
1 张三 数学 88.50
2 李四 英语 92.00

更新成功,影响行数: 1
删除成功,影响行数: 1

操作后的数据:
1 张三 数学 95.00

3. C++ 操作 MySQL

1
2
3
4
5
6
7
8
9
10
11
12
13
14
15
16
17
18
19
20
21
22
23
24
25
26
27
28
29
30
31
32
33
34
35
36
37
38
39
40
41
42
43
44
45
46
47
48
49
50
51
52
53
54
55
56
57
58
59
60
61
62
63
64
65
66
67
68
69
70
71
72
73
74
75
76
77
78
79
80
81
82
83
84
85
86
87
88
89
90
91
92
93
94
95
96
97
98
99
100
101
102
103
104
105
106
107
108
109
110
111
112
113
114
115
116
117
118
119
120
121
122
123
124
125
126
127
128
129
130
131
132
133
134
135
136
137
138
139
140
141
142
143
144
145
146
147
148
149
150
151
152
153
154
155
156
157
158
159
160
161
162
163
164
165
166
167
168
169
170
171
172
173
174
175
176
177
178
179
#include <iostream>
#include <memory>
#include <mysql/mysql.h> // MySQL C API 头文件,C++ 可以直接调用 C 接口

class StudentDB
{
public:
StudentDB(const std::string &host, const std::string &user,
const std::string &pass, const std::string &db)
{
// 1. 初始化连接句柄
// mysql_init(nullptr): 参数为空表示让库自动分配 MYSQL 结构体内存
conn = mysql_init(nullptr);
if (conn == nullptr)
{
std::cerr << "mysql_init() 失败!" << std::endl;
exit(1);
}

// 2. 建立连接
// 参数说明:mysql_init返回的句柄, 主机名或IP地址, 用户名, 密码, 数据库名, 端口(0表示默认), socket文件名, 客户端标志
if (mysql_real_connect(conn, host.c_str(), user.c_str(),
pass.c_str(), db.c_str(), 0, nullptr, 0) == nullptr)
{
finish_with_error(); // 连接失败,打印错误并退出
}
}

~StudentDB()
{
if (conn)
{
mysql_close(conn); // 关闭连接并释放句柄内存
}
}

// 插入操作
bool insert(const std::string &name, const std::string &subject, double score)
{
char query[256]; // 缓冲区,用于存储拼接好的 SQL 语句

// snprintf: 安全的格式化字符串函数,防止缓冲区溢出
// 注意:实际更推荐使用 mysql_real_escape_string 处理特殊字符防止 SQL 注入
snprintf(query, sizeof(query),
"INSERT INTO student_score (name, subject, score) VALUES ('%s', '%s', %.2f)",
name.c_str(), subject.c_str(), score);

// mysql_query: 执行 SQL 语句
// 返回值:非 0 表示执行失败
if (mysql_query(conn, query))
{
std::cerr << "INSERT失败: " << mysql_error(conn) << std::endl;
return false;
}

// mysql_affected_rows: 获取受影响的行数,通常用于验证插入是否真的发生
std::cout << "插入成功,影响行数: " << mysql_affected_rows(conn) << std::endl;
return true;
}

// 查询并打印所有记录:流程:执行 SQL -> 获取结果集 -> 遍历行 -> 释放结果集
void queryAll()
{
// 执行查询语句
if (mysql_query(conn, "SELECT id, name, subject, score FROM student_score"))
{
std::cerr << "SELECT失败: " << mysql_error(conn) << std::endl;
return;
}

// mysql_store_result: 将查询结果从服务器全部取回并存储在本地内存
// 返回值:MYSQL_RES 指针,失败返回 NULL
MYSQL_RES *result = mysql_store_result(conn);
if (result == nullptr)
{
std::cerr << "mysql_store_result()失败: " << mysql_error(conn) << std::endl;
return;
}

// mysql_num_fields: 获取结果集中的列数(字段数量)
int num_fields = mysql_num_fields(result);
MYSQL_ROW row; // MYSQL_ROW 实际上是 char** 类型,代表一行数据

std::cout << "-----------------------------------" << std::endl;

// mysql_fetch_row: 从结果集中逐行获取数据
// 返回值:下一行的数据,如果没有更多行则返回 NULL
while ((row = mysql_fetch_row(result)))
{
for (int i = 0; i < num_fields; i++)
{
// row[i]: 访问当前行的第 i 列
// 注意:如果数据库字段值为 NULL,row[i] 指针也是 NULL
// 这里使用三元运算符进行 NULL 指针保护
std::cout << (row[i] ? row[i] : "NULL") << "\t";
}
std::cout << std::endl;
}
std::cout << "-----------------------------------" << std::endl;

// mysql_free_result: 释放 result 占用的内存
// 非常重要:每次查询后必须释放,否则会造成严重的内存泄漏
mysql_free_result(result);
}

// 更新数据
bool update(const std::string &name, const std::string &subject, double newScore)
{
char query[256];
snprintf(query, sizeof(query),
"UPDATE student_score SET score = %.2f WHERE name = '%s' AND subject = '%s'",
newScore, name.c_str(), subject.c_str());

if (mysql_query(conn, query))
{
std::cerr << "UPDATE失败: " << mysql_error(conn) << std::endl;
return false;
}
std::cout << "更新成功,影响行数: " << mysql_affected_rows(conn) << std::endl;
return true;
}

// 删除数据
bool remove(const std::string &name, const std::string &subject)
{
char query[256];
snprintf(query, sizeof(query),
"DELETE FROM student_score WHERE name = '%s' AND subject = '%s'",
name.c_str(), subject.c_str());

if (mysql_query(conn, query))
{
std::cerr << "DELETE失败: " << mysql_error(conn) << std::endl;
return false;
}
std::cout << "删除成功,影响行数: " << mysql_affected_rows(conn) << std::endl;
return true;
}

private:
MYSQL *conn; // MySQL 连接句柄指针,操作数据库的核心对象

// 内部错误处理函数,打印错误信息、关闭连接并退出程序
// 注意:在构造函数失败时调用,因为对象可能未完全构造,无法依赖析构函数
void finish_with_error()
{
std::cerr << mysql_error(conn) << std::endl;
mysql_close(conn); // 发生错误时手动关闭连接,防止资源泄漏
exit(1);
}
};

int main()
{
// 1. 实例化数据库对象
// 构造函数会自动执行 mysql_init 和 mysql_real_connect
StudentDB db("localhost", "local_minbit", "123456", "local-C-test");

// 2. 插入测试数据
db.insert("张三", "数学", 88.5);
db.insert("李四", "英语", 92.0);

std::cout << "\n初始数据:" << std::endl;
db.queryAll();

// 3. 更新数据:将张三数学成绩修改为 95.0
db.update("张三", "数学", 95.0);

// 4. 删除数据:删除李四的英语成绩
db.remove("李四", "英语");

std::cout << "\n操作后数据:" << std::endl;
db.queryAll();

// 5. 程序结束
// main 函数结束时,局部变量 db 会被销毁,自动调用析构函数 ~StudentDB()
// 析构函数会执行 mysql_close(conn),确保连接安全关闭
return 0;
}

运行输出结果:

1
2
3
4
5
6
7
8
9
10
11
12
13
14
15
16
17
插入成功,影响行数: 1
插入成功,影响行数: 1

初始数据:
-----------------------------------
1 张三 数学 95.00
3 张三 数学 88.50
4 李四 英语 92.00
-----------------------------------
更新成功,影响行数: 1
删除成功,影响行数: 1

操作后数据:
-----------------------------------
1 张三 数学 95.00
3 张三 数学 95.00
-----------------------------------

3. Windows 中使用 C/C++ 操作 MySQL

1. 准备工作:确保 Linux 上的 MySQL 允许远程连接

  1. 修改 MySQL 配置文件: 更改或新增 bind-address 行为 0.0.0.0

    1
    vim /etc/mysql/mysql.conf.d/mysqld.cnf
    1
    2
    3
    4
    5
    6
    7
    8
    9
    10
    11
    12
    13
    14
    15
    16
    17
    18
    19
    20
    21
    22
    23
    24
    25
    26
    27
    28
    29
    30
    31
    32
    33
    34
    35
    36
    37
    38
    39
    40
    41
    42
    43
    44
    45
    46
    47
    48
    49
    50
    51
    52
    53
    54
    55
    56
    57
    58
    59
    60
    61
    62
    63
    64
    65
    66
    67
    68
    69
    70
    71
    72
    73
    74
    75
    76
    77
    78
    79
    80
    81
    82
    83
    84
    85
    86
    87
    88
    89
    90
    91
    92
    93
    94
    95
    96
    #
    # The MySQL database server configuration file.
    #
    # One can use all long options that the program supports.
    # Run program with --help to get a list of available options and with
    # --print-defaults to see which it would actually understand and use.
    #
    # For explanations see
    # http://dev.mysql.com/doc/mysql/en/server-system-variables.html

    # Here is entries for some specific programs
    # The following values assume you have at least 32M ram

    [mysqld]
    #
    # * Basic Settings
    #
    user = mysql
    # pid-file = /var/run/mysqld/mysqld.pid
    # socket = /var/run/mysqld/mysqld.sock
    # port = 3306
    # datadir = /var/lib/mysql


    # If MySQL is running as a replication slave, this should be
    # changed. Ref https://dev.mysql.com/doc/refman/8.0/en/server-system-variables.html#sysvar_tmpdir
    # tmpdir = /tmp
    #
    # Instead of skip-networking the default is now to listen only on
    # localhost which is more compatible and is not less secure.
    bind-address = 127.0.0.1
    mysqlx-bind-address = 127.0.0.1

    # ===== 自定义扩展配置 =====
    # 设置默认字符集为 utf8mb4,防止中文和 emoji 乱码
    character-set-server = utf8mb4
    collation-server = utf8mb4_general_ci

    # 启用远程访问(默认仅本机),保持仅本地访问(通过 Xshell 登录服务器再操作)可将 0.0.0.0 设置为 127.0.0.1
    bind-address = 0.0.0.0
    mysqlx-bind-address = 0.0.0.0

    # 使用传统认证插件,兼容 Navicat、旧版客户端
    default-authentication-plugin = mysql_native_password

    # 可选:增加连接稳定性
    # max_connections = 200
    # wait_timeout = 600
    # interactive_timeout = 600

    #
    # * Fine Tuning
    #
    key_buffer_size = 16M
    # max_allowed_packet = 64M
    # thread_stack = 256K

    # thread_cache_size = -1

    # This replaces the startup script and checks MyISAM tables if needed
    # the first time they are touched
    myisam-recover-options = BACKUP

    # max_connections = 151

    # table_open_cache = 4000

    #
    # * Logging and Replication
    #
    # Both location gets rotated by the cronjob.
    #
    # Log all queries
    # Be aware that this log type is a performance killer.
    # general_log_file = /var/log/mysql/query.log
    # general_log = 1
    #
    # Error log - should be very few entries.
    #
    log_error = /var/log/mysql/error.log
    #
    # Here you can see queries with especially long duration
    # slow_query_log = 1
    # slow_query_log_file = /var/log/mysql/mysql-slow.log
    # long_query_time = 2
    # log-queries-not-using-indexes
    #
    # The following can be used as easy to replay backup logs or for replication.
    # note: if you are setting up a replication slave, see README.Debian about
    # other settings you may need to change.
    # server-id = 1
    # log_bin = /var/log/mysql/mysql-bin.log
    # binlog_expire_logs_seconds = 2592000
    max_binlog_size = 100M
    # binlog_do_db = include_database_name
    # binlog_ignore_db = include_database_name

    然后重启 MySQL:

    1
    sudo systemctl restart mysql
  2. 创建允许从 Windows IP 连接的数据库用户(或修改现有用户)

    1
    2
    3
    4
    5
    mysql> create user 'win_test'@'%' identified by '123456';
    Query OK, 0 rows affected (0.01 sec)

    mysql> grant all privileges on *.* to 'win_test'@'%';
    Query OK, 0 rows affected (0.01 sec)
  3. 检查防火墙:确保 Linux 防火墙(如 ufw)开放 MySQL 端口(默认 3306):

    1
    sudo ufw allow 3306/tcp

2. 在 Windows 上安装 MySQL

  • 下载:访问 MySQL Community Downloads,选择 Windows (x86, 64-bit), ZIP ArchiveMSI Installer

  • 安装:如果下载 ZIP,解压后将其 C:\Program Files\MySQL\MySQL Server 8.4\bin 目录添加到系统 PATH;如果使用 MSI,安装过程中仅选择 “Client Programs” 即可。

  • 使用:打开命令提示符,执行:

    1
    mysql -h 12x.5x.16x.x -P 3306 -u win_test -p	# 用自己公网 IP

在 Windows 上通过 MySQL Installer 安装 MySQL Server 时,通常就会包含 C API 客户端库(libmysql),但需要注意安装选项。

1. 验证 MySQL Server 是否已包含 C API 库

检查安装目录: 打开 MySQL 的安装路径(C:\Program Files\MySQL\MySQL Server 8.4),查看是否存在以下文件夹和文件:

  • include 文件夹:里面应该有 mysql.hmysql_com.h 等头文件。
  • lib 文件夹:里面应该有 libmysql.lib(静态库/导入库)和 libmysql.dll(动态链接库)。
  • 如果能找到路径(如 C:\Program Files\MySQL\MySQL Server 8.4\lib\libmysql.dll),也说明已安装。

如果这些文件存在,说明 C API 库已随服务器安装。若缺少,可能是安装时未选择开发组件。

2. 如果缺少开发组件怎么办?

  • 重新运行 MySQL Installer,选择 “Modify”,然后勾选 “Development Components”“C Connector”,安装即可。
  • 或者直接下载独立的 Connector/C 并解压到任意目录,后续配置时指向该目录。

3. 在 Visual Studio 中配置 C/C++项目

假设 MySQL 安装在 C:\Program Files\MySQL\MySQL Server 8.4(或 Connector/C 解压目录)。视频可参考:【C/C++服务器开发】C 语言/C++连接 mysql | B 站

1. 创建项目并配置属性

  • 打开 Visual Studio,创建新的控制台应用(C++)。
  • 点击 项目属性(注意配置选择“所有配置”,平台选择“x64”或“x86”匹配 MySQL 库版本)。
  • VC++ 目录 中:
    • 包含目录:添加 C:\Program Files\MySQL\MySQL Server 8.4\include
    • 库目录:添加 C:\Program Files\MySQL\MySQL Server 8.4\lib
  • 链接器 → 输入 → 附加依赖项 中添加 libmysql.lib

2. 放置运行时 DLL

libmysql.dlllib 文件夹复制到可执行文件(.exe)输出目录(例如 DebugRelease),可以参考我的路径:D:\Coding\Visual Studio 2022\pro\x64\Debug

3. 测试代码

1
2
3
4
5
6
7
8
9
10
11
12
13
14
15
16
17
18
19
20
21
22
23
24
25
26
27
28
29
30
31
#include <iostream>
#include <mysql.h> // 注意头文件名为 mysql.h

int main()
{
MYSQL* conn = mysql_init(nullptr);
if (conn == nullptr)
{
std::cerr << "mysql_init failed" << std::endl;
return 1;
}

// 尝试连接远程Linux MySQL(替换为实际IP、用户、密码)
if (mysql_real_connect(conn, "122.51.165.8", "win_test", "123456", "local-C-test", 3306, nullptr, 0) == nullptr)
{
std::cerr << "Connection error: " << mysql_error(conn) << std::endl;
mysql_close(conn);
return 1;
}

std::cout << "Connected successfully!" << std::endl;

mysql_query(conn, "SELECT VERSION()");
MYSQL_RES* res = mysql_store_result(conn);
MYSQL_ROW row = mysql_fetch_row(res);
std::cout << "MySQL version: " << row[0] << std::endl;
mysql_free_result(res);

mysql_close(conn);
return 0;
}

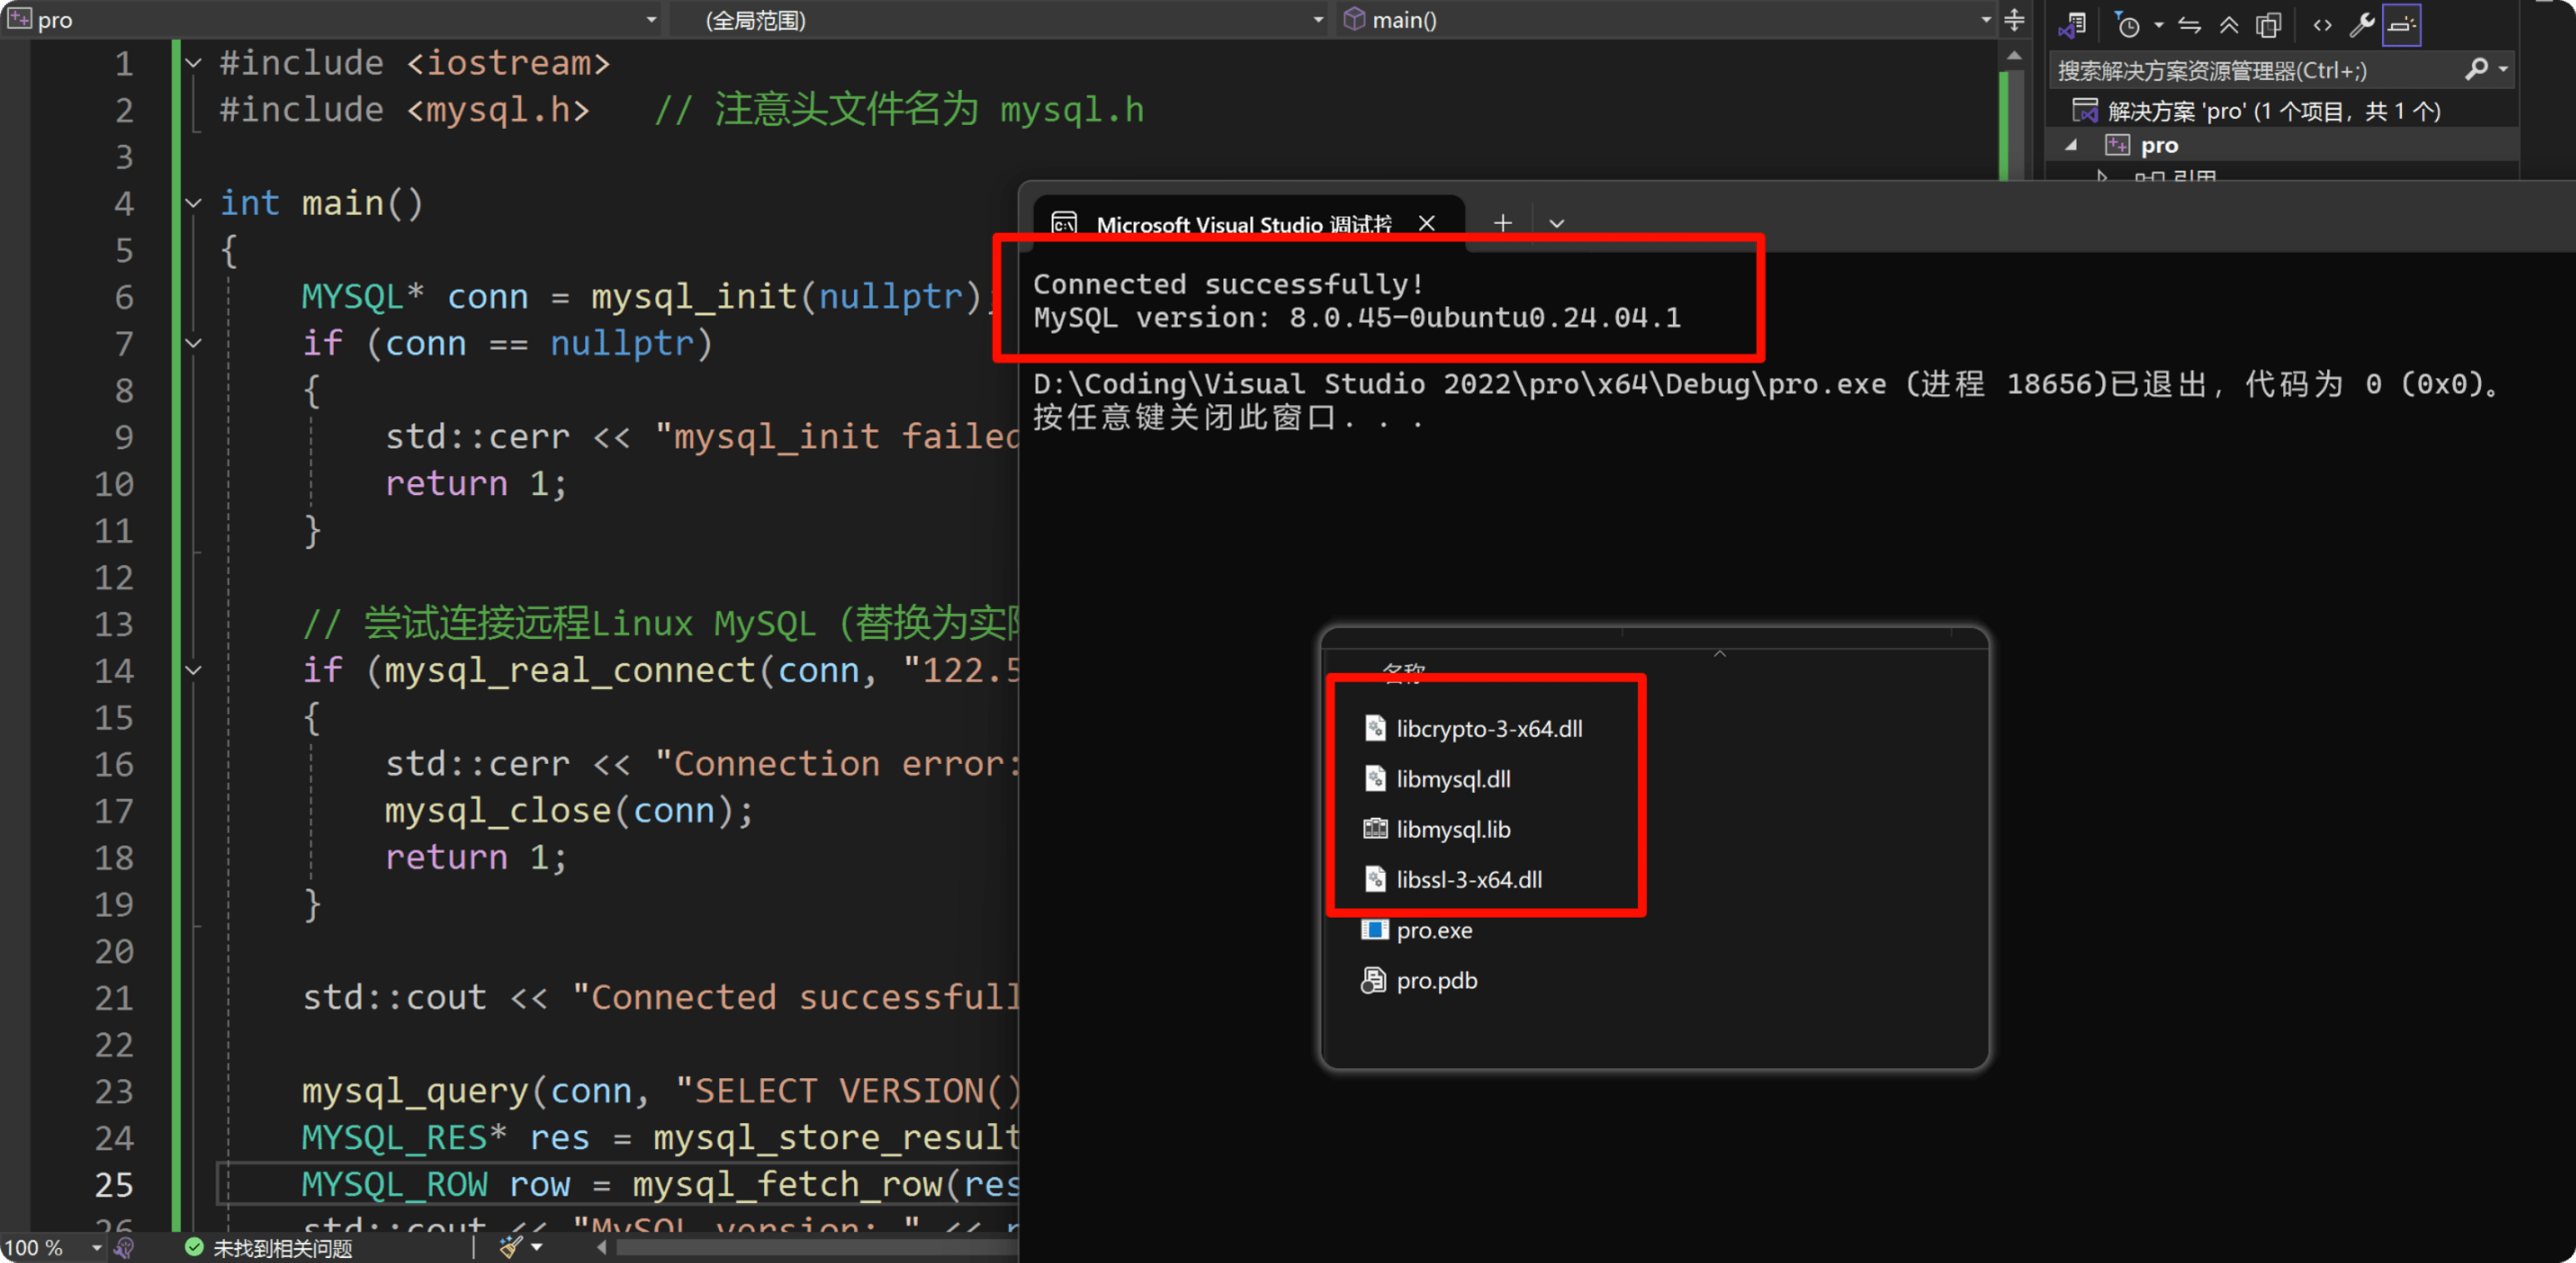
点击运行,会发现报错了,说找不到 xxx.dll(具体名字忘记了),再网络上找了一大圈,找到方案:将路径 C:\Program Files\MySQL\MySQL Server 8.4\lib 中的``libmysql.dlllibmysql.lib一并放到D:\Coding\Visual Studio 2022\pro\x64\Debug里面。激动的心颤抖的手点击运行,再次报错:**系统错误,由于找不到 libssl-3-x64.dll,无法继续执行代码。重新安装程序可能会解决此问题。**真是天塌了,于是苦苦再次寻觅互联网,才找到解决办法:**[解决 libssl-3-x64.dll 问题的办法](https://www.reddit.com/r/PunishingGrayRaven/comments/1boqyag/for_people_with_libssl3x64dll_problems/?tl = zh-hans)、[Punishing gray raven dll 下载](https://drive.google.com/drive/folders/1zirEVN3fSRQL68aNDy5tgH8JxCJwLeP9)**。说实话,我也并不清楚原因,只是将下载下来的 2 个动态共享库文件一并放入到了.exe`同级目录下(前前后后总共放了 4 个文件),再次运行成功得到输出:

2025-12-26_20-07-44_1.png

我自己也不清楚,具体原因和解决原理,所以仅仅是将我的经验供大家参考! Google 搜索多次救我于水火,如果期间有其他报错,不妨试试 Google 搜索看看!

4. 在 VS Code 中配置 C/C++项目(使用 CMake)

在 VS Code 上配置就比较灵活了,方式比较多样,我们主要使用 VS Code 配合 CMake 工具链(CMake Tools 插件),因为配置比较灵活。其他方法自行 B 站/Google 了,另外,推荐文章:VSCode 环境下连接 MySQL 8.0 数据库 (C++)

1. 安装必要插件

  • C/C++ 插件(Microsoft)
  • CMake Tools 插件

2. 项目结构示例

1
2
3
4
5
6
test/
├── .vscode/
│ ├── settings.json (可选)
│ └── tasks.json (可选)
├── CMakeLists.txt
└── main.cpp

3. 编写 CMakeLists.txt

1
2
3
4
5
6
7
8
9
10
11
12
13
14
15
16
17
cmake_minimum_required(VERSION 3.10)
project(MySQLTest)

# 指定MySQL头文件和库路径(根据实际安装位置修改)
set(MYSQL_INCLUDE_DIR "C:/Program Files/MySQL/MySQL Server 8.4/include")
set(MYSQL_LIB_DIR "C:/Program Files/MySQL/MySQL Server 8.4/lib")

# 添加头文件搜索路径
include_directories(${MYSQL_INCLUDE_DIR})

# 添加可执行文件
add_executable(${PROJECT_NAME} main.cpp)

# 链接MySQL库
target_link_libraries(${PROJECT_NAME} ${MYSQL_LIB_DIR}/libmysql.lib)

# 注意:运行时需要将 libmysql.dll 放在可执行文件同级目录,或加入PATH

4. 配置 CMake Tools

  • 打开项目,CMake Tools 会自动检测工具链。
  • 选择配置(如 Visual Studio 2022 Release - x64)。
  • 构建(F7),然后运行。

如果不想使用 CMake,也可以手动编写 tasks.jsonlaunch.json 配置编译命令,但 CMake 更推荐。

5. 关于 libmysql.dll

无论使用哪种方式,都需要确保 libmysql.dll 在运行时可被找到!

  • 将 DLL 复制到生成的可执行文件目录(例如 build/Debug/)。
  • 或将 MySQL 的 lib 目录添加到系统 PATH。

4. 关于 MySQL Connector/C++ 的讨论

特性MySQL C APIMySQL Connector/C++
底层C 语言接口C++面向对象封装
性能极高接近 C API,略有损耗
易用性较繁琐简洁,支持异常
预处理语句支持但较复杂原生友好支持
稳定性非常成熟8.x 后稳定,早期有历史问题
依赖libmysqlclient需安装专用库
流行度非常广泛(尤其是老项目)较新,逐渐增加

实际 C++ 后端中,业务代码一般不会直接大量使用裸的 MySQL C API,而是会在底层基于 C API 封装一层数据库访问模块(如连接管理、SQL 执行、事务、结果集解析、连接池等)。MySQL Connector/C++ 虽然能用,但使用较少;更常见的是采用基于 C API 的第三方轻量库或公司内部封装,因为它们更稳定、更通用,也更方便控制性能和部署。

所以,大多数情况,我们只需要掌握 MySQL C API 的使用就行了,进阶基本上都是使用第三方库、个人/公司封装的版本、其他更便捷的方式。当然连接方式也会多样,也可以尝试一系列的图形化工具……